Food & Drink

Brown Sugar–Cinnamon Hand Pies

In her cookbook, When Pies Fly, author Cathy Barrow gives a seriously delicious upgrade to a certain childhood toaster treat

Photo: Christopher Hirsheimer


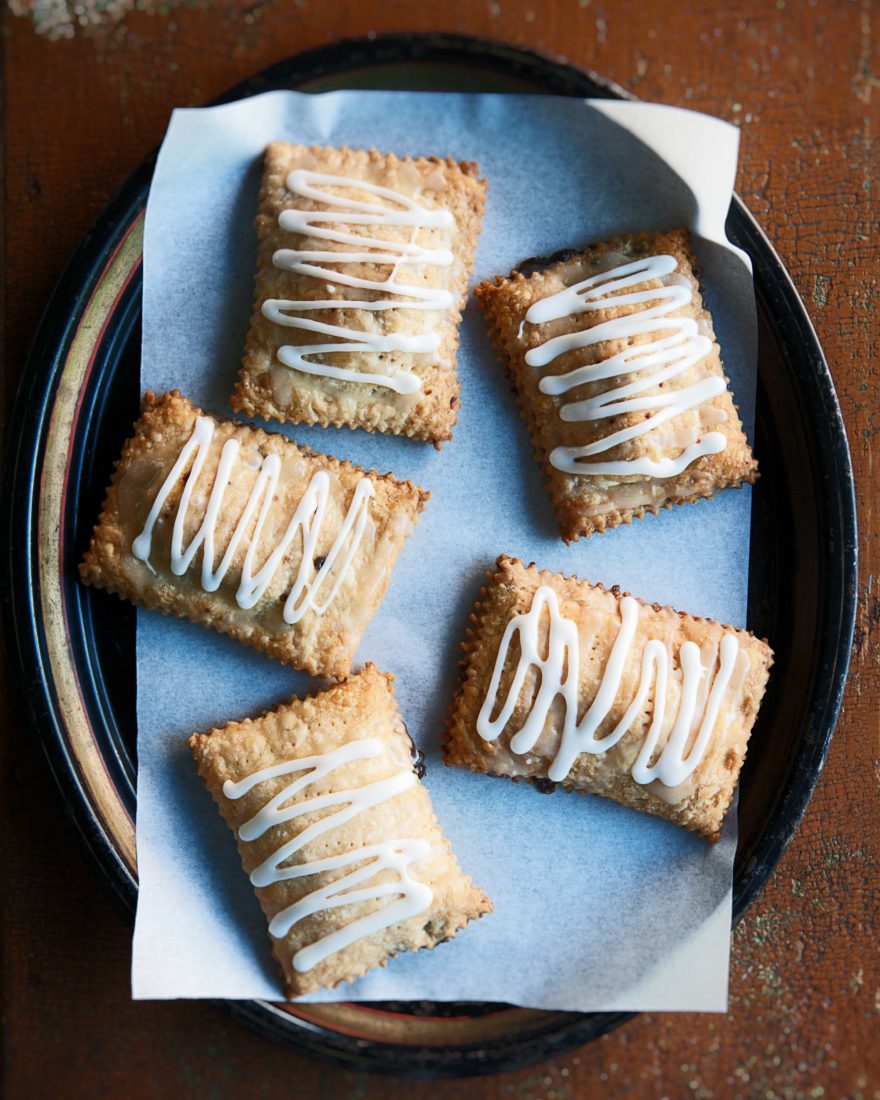
There’s a certain popular brown sugar breakfast pastry that was my constant companion through years of rid­ing horses and hot days at competitions. I kept packets in the trunk of my car for plummeting blood sugar moments, but also because they were a food filled with memories, a child­hood favorite with a slightly sandy filling offset by sugary, silky frosting. Using common pantry ingredients, these pies retain those familiar qualities, but so much more deliciously. Adding cocoa powder will not make the filling taste like chocolate at all, but only serves to intensify the spicy cinnamon—a trick I picked up from [the revered pastry chef and author] Maida Heatter’s cinnamon swirl bread. Cathy Barrow


Excerpted from When Pies Fly: Handmade Pastries from Strudels to Stromboli, Empanadas to Knishes to Kolaches by Cathy Barrow (copyright © 2019 by Cathy Barrow).  Reprinted with permission from Grand Central Publishing.  All rights reserved.


Ingredients

  • Brown Sugar–Cinnamon Hand Pies (Makes 12)

    • 2 cups packed dark brown sugar

    • ⅓ cup all-purpose flour

    • 1½ tablespoons cocoa powder (Dutch process or natural, it doesn't matter)

    • 3 tablespoons ground cinnamon

    • ½ teaspoon freshly grated nutmeg

    • ¼ teaspoon kosher salt

    • 4 tablespoons unsalted butter, melted

    • 2 recipes All-Butter Pie Dough (recipe follows), formed into square blocks

    • Egg wash (1 egg beaten with 1 tablespoon cool water and ¼ teaspoon kosher salt)

    • 2 tablespoons cold milk

    • ½ teaspoon vanilla extract

    • 2 cups powdered sugar

    • Sparkling sugar

  • All-Butter Pie Dough (Makes 1 recipe pie dough)

    • 1⅓ cups all-purpose flour

    • 8 tablespoons unsalted butter, cubed and frozen for 20 minutes

    • Scant pinch kosher salt

    • ¼ cup ice water


Preparation

  1. For the brown sugar–cinnamon hand pies:  Line two baking sheets with parchment. Place a Baking Steel, baking stone, or inverted baking sheet on the center rack and heat the oven to 400°F.

  2. Stir the brown sugar, flour, cocoa powder, cinnamon, nutmeg, and salt together. Add the melted butter and stir until the filling is thick and no longer powdery at all.

  3. Remove one block of dough from the refrigerator. Roll out the dough to an approximate 11-inch square, cut into 12 (3½- to 4½-inch) rectangles, and vent half of them. Add a packed scant ¼ cup filling to one rectangle and form a hand pie with a second (vented) rectangle. Transfer to a baking sheet and firmly fork-crimp the edges. Brush the surface with egg wash.

  4. Continue to make the remaining pies. Refrigerate or freeze while repeating the process with the other block of pie dough to make a total of 12 hand pies.

  5. Bake the hand pies for 30 to 35 minutes, until deeply golden brown. I prefer to bake them one baking sheet at a time to take advantage of the Baking Steel in my oven. If you prefer to bake the two sheet pans at the same time, switch their position from top to bottom and front to back halfway through the bake.

  6. Freeze unfrosted hand pies (baked or unbaked) for up to 3 months.

  7. Whisk the milk and vanilla together and then whisk into the powdered sugar until smooth and very thick. If it isn’t coming together, dribble in the tiniest additional amount of milk. If it’s too thin, add more powdered sugar. Transfer to a pastry bag or ziptop bag, snip off a corner, and squiggle the frosting across the surface of each pie. (Or use an offset spat­ula to spread the frosting evenly across the surface, inside the crimped edges.) Garnish enthusiastically with plenty of sparkling sugar. Let the frosting set up, about 30 minutes, before serving.

  8. For the all-butter pie dough: Place the work bowl of the food processor on the scale, set the scale to zero, and weigh the flour into the bowl. Weigh in the butter and add the salt. Move the bowl to the food pro­cessor base, insert the metal blade, cover, and use the Pulse function to cut the flour and butter into flour-covered pea-sized pieces, about 15 quick pulses. Add the ice water all at once and process until the dough almost comes together in a ball. All the flour will be dampened and the dough will clump.

  9. Spend time on this next step because the more compact and precise the dough, the easier it is to roll to the correct size and thickness. Form an X with two long pieces of over­lapping plastic wrap and lightly flour the surface. Dump the dough onto the center of the plastic wrap, scraping the pro­cessor bowl clean. Wrap the sloppy gathering of dough in the plastic and, at the same time, use a bench scraper (not your warm hands that might melt the butter clumps) to form the dough into a 4-inch disk or a 3½- by 3½-inch block. Once wrapped, use a rolling pin to gently press across the surface of the dough, then flip it over and do the same on the other side. Now let it rest: Refrigerate the dough for at least 4 hours or preferably overnight. Alternatively, slip the plas­tic-wrapped dough block into a ziptop bag and freeze it for up to 3 months. Defrost gently, overnight in the refrigerator.


tags: